Tuesday, February 28, 2012

Nickel Churn Dash and Greek Cross quilt block tutorial


How to make a Churn Dash or Greek Cross quilt block from 5" fabric squares ( known as nickel or charm squares)


                     Churn Dash quilt block
Greek Cross quilt block

Step 1.  Cut the following 5" squares of fabric or use pre-cut squares from a charm pack.

Step 1

Step 2.  Draw a line on the back of the white squares. Draw line down the center of 2 squares and diagonally on the other 2 squares as shown below.  I just use a mechanical pencil to draw my lines because it makes a very fine line and you can get close to the ruler.


Step 2


Step 3.  Place a blue square and a white square that has been marked with a diagonal line, right sides together with.  Repeat for the remaining blue square.  Place a red square and a white square that has been marked down the middle, right sides together. Repeat for the remaining red square.

Step 4.  Sew 1/4" away from each side of the marked line for each set of squares that you placed right sides together.


Step 4


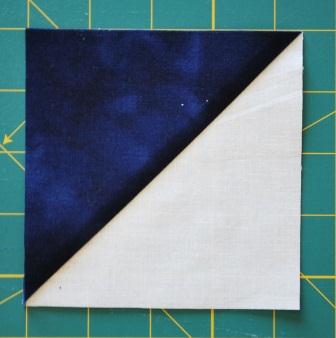
Step 5.  After sewing on each side of the line, cut on the marked line.  This cutting does not have to be accurate since you've already done your sewing.  Cut with your rotary cutter or scissors. Your blocks will look like this before they are pressed.


Step 5

Step 6.  Press blocks open.  Press seam to dark fabric.  The blocks should look like this.


Step 6

Step 7.  Square up the half square triangle blocks to 4 1/2" by trimming as shown below.  Line the ruler up with the block on the diagonal line.  Trim 2 sides and then reposition your ruler to trim the last to sides.  You may have very little to trim as shown.


Step 7
                                                                             
trimmed half square triangle block
         
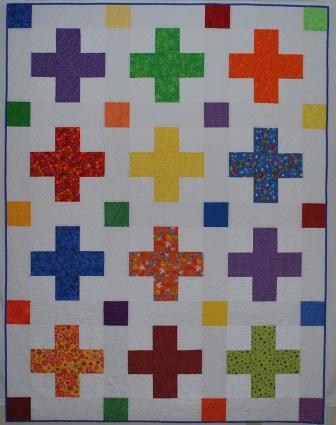
Step 8.  After your half square triangles are trimmed, all of the units of your block are done.  Arrange the units as shown below to make either a Churn Dash quilt block or a Greek Cross quilt block. 


Churn Dash quilt block

Greek Cross quilt block
Step 9.  Sew the block together by sewing in rows, i.e. sew the 3 blocks in the top row together, the 3 in the center row together, and the 3 in the bottom row together.  Then, sew the 3 rows together.

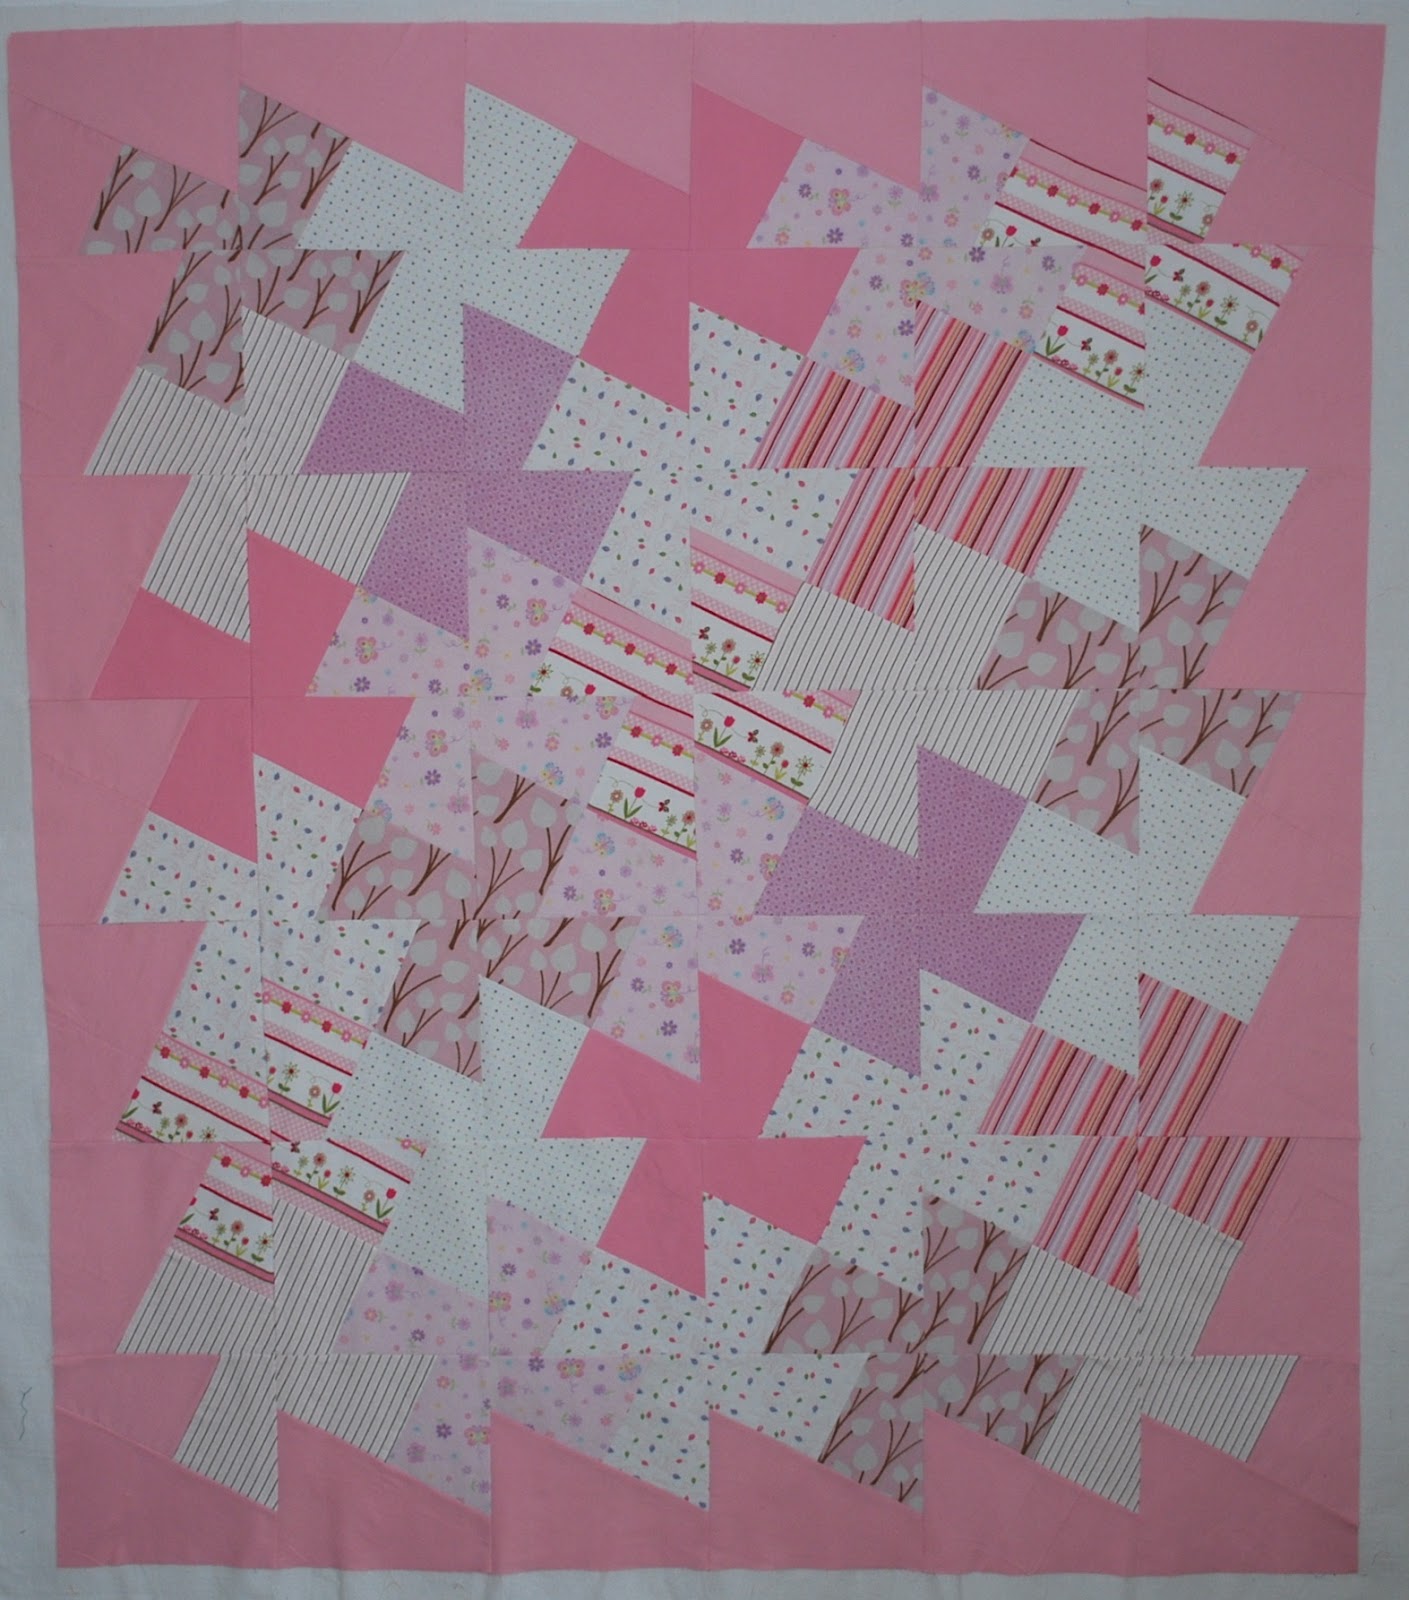
I love this block because you use all of the nickel square without having to trim any down to
4 1/2" like you do in many patterns.  To create the scrappy corners in my Crosswise quilt, I used 4 different half square triangles at the corners of the block.  Since 1 white square and 1 print square make 2 half square triangles, there are duplicate half square triangle blocks used throughout the quilt to create the scrappy look.

There are many ways to arrange these units and many names for this block if the color placement is moved around. Some of the other names are Broken Plate, Double Monkey Wrench, Double T, Dragon's Head, Fisherman's Reel, Hems and Chickens, Hole in the Barn Door, Indian Hammer, Joan's Doll Quilt, Lincoln's Platform, Love Knot, Ludlow's Favorite, Old Mill Design, Picture Frame, Puss in the Corner, Quail's Nest, Sherman's March, Shoo Fly, Wrench, Grecian Design, Grecian Square, Grecian, and Greek Square according to Maggie Malone's book entitled 5,500 Quilt Block Designs.


Thursday, February 23, 2012

Crosswise quilt is done


My Crosswise quilt is finally quilted and bound.  You can read my previous post about this quilt here.

Crosswise quilt


What I like the most about this quilt is the block.  It has been called Churn Dash, Monkey Wrench and Greek Cross.  What I like about this block is how perfectly it can be sewn using nickel fabric squares.  I plan to post a tutorial showing how to construct it.

Linda used a pantograph quilting design called Double Bud and Puff batting to create alot of dimension on this little quilt.  The thick batting makes the quilting stand out more.  She has some pictures on her blog that illustrate this a little better.

Double Bud pantograph quilting
I'm showing the back of the quilt here to point out what can happen when you use a white or mostly white background.  Can you see the shadows of the blocks showing through?


This post is linked to:

Monday, February 20, 2012

Receiving Blanket quilts

Lainey's small quilt

Doll quilt #1
Doll quilt #2
Doll quilts showing reverse side

After spending way too much time and energy trying to make Lainey's Big Twister receiving blanket quilt reversible, I gave up and found some fabric in my stash that I can use for the backing. I'll post that after it has been quilted. Instead of a reversible quilt, she gets a second smaller quilt, 41" X 45", and two quilts for her "babies"(dolls) that are reversible.  I used the leftover waste squares from the Big Twister quilt to make Lainey's small quilt and both sides of Doll quilt #2.  The leftover squares just happen to be 5" squares!

I had wanted to make the Big Twister quilt reversible because that's how I made her older brother and sister's quilts.   In fact, I made her brother two!!  Of course, he's the oldest.  My youngest granddaughter turns two in May so her blankets are waiting to be made into a quilt also.  Hers will be much easier because they are all color coordinated. Here are a few poor pictures of the other quilts I made. I didn't even get the back side of the last two but they are about the same as the front.


Monday, February 13, 2012

Big Twister quilt


Big Twister quilt
My daughter has had me make quilts for each of her children out of their receiving blankets once they have outgrown them.  After the first two, I got a little behind.  Child number three is already 3 years old so she requested that I make this quilt bigger than the other two quilts that I made.  She told me to just cut them up into 12 1/2" squares and be done with it.  I tried but just couldn't leave well enough alone.  I couldn't arrange the squares in any fashion that I liked.  I decided a twister quilt might work but my squares were too big to use the Twister tool.  So, I figured out the math and made a Big Twister quilt.  I like the look much better and my granddaughter Lainey Jane loves it!  Now, what to do for the back.  The other two quilts are reversible.  I'll show the other two receiving blanket quilts in my next post.

On another note, here's an idea for a quilt.  My grandson Macklane has just redecorated his bedroom with a camouflage theme.  I used camouflage fleece and black flannel to make a quilt for his room.  The two fabrics were quilted together with a large stipple design. No batting was used so I guess technically it's not a "quilt" but Mack loves it just the same.  I used black flannel for the binding and machine stitched it in place which was a great time saver.  Makes for a very quick and easy project!


Friday, February 10, 2012

Crosses and Dots quilt done!

Crosses and Dots quilt

My Crosses and Dots quilt is quilted.  This is the last quilt from my challenge to go to a family member!
Click here to read my previous post about this quilt.


Linda used an edge to edge custom quilting pattern on this quilt.  She describes it as freehand spirals with an occasional flower.  You can see better photos on her blog at L&R Designs.

Saturday, February 4, 2012

Ribbonry and Roll of Nickels #2


I have been working on the design of the quilt that you all voted on. I reworked the design in EQ7 and made a few changes to the layout. I also came up with a way to construct it from nine patch blocks. It looks like woven ribbons to me so I am naming it Ribbonry.  Now, to find fabrics to use.  I'm struggling with this!


Roll of Nickels quilt #2

On another note, I made another Roll of Nickels quilt.  I have never made so many mistakes on a quilt in my entire life.  It took forever!  I started with a stack of 5 1/2" squares of homespun fabric left from a previous quilt.  I decided to leave them that size and just cut my background strips to 5 1/2" but instead I cut them at 5".  This meant I then had to cut all the 5 1/2" squares down to 5".  What a pain!!

It doesn't stop there.  I next cut all my 5" background strips down to 5" X 13 1/2" strips instead of 14" strips which meant I could no longer make the quilt blocks as disappearing nine patch blocks.  I had to cut all the background pieces as individual pieces and buy more fabric.  I ended up with the same result but the reason I had designed it as a disappearing nine patch in the first place because it was so fast and easy.  Cutting and sewing all those pieces was neither fast nor easy.  You can go here to see how I made the first one.


Roll of Nickels #2 quilt
Overlapping Squares Meander quilting
Roll of Nickels quilt
Square Loop Meander quilting

Linda of  L&R Designs Quilting used a different quilting design on this second quilt.  It's called an Overlapping Squares Meander.  I love it.  You can read her post here.


I used a plaid homespun fabric from my stash for the backing.  This quilt went to a grandson in Denver.  The first Roll of Nickels quilt went to his cousin in Illinois.

Thursday, February 2, 2012

Triangle Confusion quilt finished

I posted about my  Triangle Confusion quilt way back in August!  Here's the finished quilt which has actually been done for quite some time.  Just forgot to post it. I love the secondary patterns that are created in this quilt.  I think it's hard to pick out the original block!  This is a very scrappy quilt made completely of half square triangle blocks that are made from a dark nickel fabric square and a light nickel fabric square.  I used scraps from a wide variety of fabrics including some not very pretty ones so don't hesitate using fabrics you aren't too fond of any more in a scrappy quilt. 


Triangle Confusion block
Triangle Confusion quilt


I love the quilting design Linda used too.   She stitched from one corner to the middle of the opposite side of the block and back to the opposite corner, like making a triangle.


I pieced the back with fabric from my stash also.  This quilt is staying at my house!


This post is linked to: