After making this mini quilt, I realized I could make the area I have circled below better. I'm not crazy about all those seams in that area so I eliminated them and wrote a tutorial which is posted below the photo.
How to make a scrappy Dutch Rose quilt block from 5" squares of fabric (known as nickel or charm squares) tutorial
 |
| Scrappy Nickel Dutch Rose quilt block |
1. You will need the following fabrics for 1 quilt block:
 |
| 1 3/4" "bonus" blocks |
If you don't want the extra block, don't draw or sew on the second line. Just trim 1/4" from the corner to corner diagonal line after sewing on it to complete your block. Make 8 blocks like this.
3. To make the block in the center of each side, follow the steps shown below to make 4 units.
4. To make the points of the center star block, follow these steps and make 4:
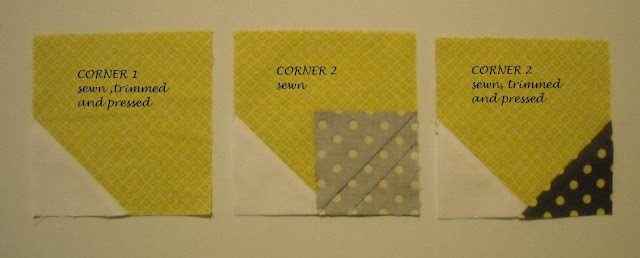
7. To finish the corner blocks, add your corners, 2 background blocks and 2 half square triangle blocks as shown. All four corners are made the same.
8. Arrange the blocks as shown below and sew together in rows.
9. Sew the rows together and the block is complete!


That's awesome! Great directions, love the end result and the colors!
ReplyDeleteGreat tutorial! Connector blocks are always so much fun to use!
ReplyDeleteQuilting by the River
Thanks for sharing. I had eliminated some of the seams but this will eliminate more and that is a good idea!
ReplyDeleteLove the fabric choices.
ReplyDeleteWhat is the size of the finished block?
The finished size is 16".
DeleteAlso love the fabric colors. Very pretty!
ReplyDeleteThose big Swoon blocks sure must make a quick quilt, despite all the small pieces. Great math work on your tutorial to eliminate extra seams!
ReplyDeleteThanks so much for linking Candace!
ReplyDeleteLinky Party Tuesday
I love your fabric choices! I've been seeing a ton of swoon blocks but I love how you changed the corners!
ReplyDeleteVicki @ Quilting Lodge
A great tutorial...thanks, I am going to try this!
ReplyDeleteI have been looking for an easy tutorial since I saw these mentioned on About.com. And YOU DID IT. Thanks so much!!
ReplyDeleteGreat tutorial. I love charm packs and this is just the thing for me :)
ReplyDeleteI didn't want to make this block because of all the pieces but now I might! Thanks for being so creative!
ReplyDeleteI did not like all those seams either - I saw so many wonky polka dots or mis-matched direction in prints. I was discouraged from trying this block because of that, but this makes a huge difference! Thanks!
ReplyDeleteThis comment has been removed by a blog administrator.
ReplyDeleteYea for U!! After diligently searching the internet some how I found your blog. Thanks!! I am so ready to follow your instructions.
ReplyDeleteRuby in MS
Thanks for your great instructions! I used a layer cake, and just cut my 10" x 10" into quarters. I would post a picture if I knew how.
ReplyDeleteThis is my double nickle year as well. Love your blog. God bless <3
Sally
Thanks for making the swoon a little easier. I just bougth the pattern a few
ReplyDeleteweeks ago and have had it on my sew table trying to figure out how I want to do this,
found lots of inspiration on Pinterest and that is how I found you!!
and I just moved on from my double nickle year...
This is so smart ... thank you for sharing your talent!
ReplyDeleteBrilliant! Thank you for this great tut and I am a bonus HST fan, also!
ReplyDeleteRecently found your directions for this block Dutch Rose, after also recently noticing many Swoon blocks online-Pinterest, blogs, etc. and I have made 2 blocks with your directions, replacing only the corners with the solid background fabric. It has been fun and they are pretty, made with fabric fat quarters I won on SewCanShe.com, fabric is Grace collection by Anna Griffin. thanks for your great directions. cjsilling in NM
ReplyDeleteThank you so much for a very clear tutorial on a beautiful block. I am in a block swap and this is going to be my next one for sure.
ReplyDeleteDetailed easy directions..... Thank you!!!!!!! Love your fabric choices
ReplyDeleteJust finished making one of these for a travelling quilt. Thanks so much for posting this tutorial, it really helped me out!
ReplyDeleteWould it be possible to make this entire quilt block with squares and half-square triangles? Thank you in advance!
ReplyDeleteLisa Peden
Candace, thanks so much for posting this pictorial tutorial - and FREE! I've also been sewing since I was a kid (8 when I started to make my own clothes) and started quilting in my 30s. I only just recently joined Craftsy and saw the "Swoon" pattern but honestly, I'm just too cheap to pay for a quilt block pattern. Then after much earnest Googling, I found your fantastic blog. I love that history lesson, too! I shall call this the Dutch Rose block from now on :) And I definitely want to use the "nickel" method to use up many of my scraps. I'm working on a baby quilting ministry at my church and we have a ROOM full of scraps--and annual sale to raise money for our missions. I can't wait to make a bunchaton of these quilts. Looks like it works up fairly quickly once you get the hang of it so once or twice and I"ll be cranking them out. Yay! You have a great blog. I'll have to catch up on the last 3 years' worth since your Dutch Rose tutorial. Bless you for sharing free of charge.
ReplyDelete