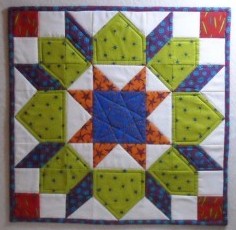
Friday, March 16, 2012

Ribbonry is done and Blog Hop Party begins

Ribbonry quilt
My Ribbonry quilt is complete. Woo hoo!!  I finally figured out a very quick and easy way to make this quilt using nickel nine patch quilt blocks and I have written a pattern for it too. Keep reading to see how you can win one! The nickel nine patch block is simply a block made from nine 5" squares of fabric and is the basic block in several of my patterns including two FREE patterns that are posted here.

I even quilted this one myself!  I used irregular lines of quilting across the width of the quilt.  It actually turned out exactly like I planned.  I also pieced the batting.  It was way easier than I could ever imagine.  I just butted edges together that I could tell had not been cut and used a wide zigzag stitch to sew them together.  Very easy and thrifty!  I have so many scraps of batting from all those quilts I made last year and I need to use them.


Those of you who are familiar with this blog may remember voting for which quilt I should make next during the last Blog Hop Party in December.

This is the rough design that received the most votes-

Ribbonry quilt
Blog Hop Party with Give-Awaysand my Ribbonry quilt is the final product just in time for the next  Blog Hop Party hosted by Quilting Gallery.  Starting Saturday, March 17th, you can join in on the fun. There will be lots of sites to visit and each one will be having a give-away!  Please tell all your friends too.


For my Give-Away, I'll be giving away 5 FREE patterns of Ribbonry and 5 FREE patterns of  Triangle Confusion, another recently released pattern. To be entered in the drawing, leave a comment on this post telling me which pattern you would like to have. Make sure I have an email address for you so I can send you a pattern if you are chosen.  All winners will be chosen at random on March 24th after the hop ends on the 23rd.

Ribbonry quilt
Triangle Confusion quilt


Monday, March 12, 2012

Scrappy Nickel Dutch Rose quilt block tutorial

Here's what's on my design wall today.  See what's on other quilters design walls at Design Wall Monday and checkout Linky party Tuesdays at Quilting by the River.


After making this mini quilt, I realized I could make the area I have circled below better.  I'm not crazy about all those seams in that area so I eliminated them and wrote a tutorial which is posted below the photo.


How to make a scrappy Dutch Rose quilt block from 5" squares of fabric (known as nickel or charm squares) tutorial

Scrappy Nickel Dutch Rose quilt block

1.  You will need the following fabrics for 1 quilt block:


1 3/4" "bonus" blocks
2. I used the method shown below for all half square triangle blocks and corners.  Draw a line diagonally from corner to corner on the wrong side of one of the squares and draw a second line 1/2" away. Place 2 squares right sides together and sew on both lines.  Cut between the sewn lines and you end up with a 1 3/4" half square triangle block from each corner as a bonus block that can be used for another project.
 If you don't want the extra block, don't draw or sew on the second line.  Just trim 1/4" from the corner to corner diagonal line after sewing on it to complete your block. Make 8 blocks like this.


3.  To make the block in the center of each side, follow the steps shown below to make 4 units.


4.  To make the points of the center star block, follow these steps and make 4:


5.  Sew the 2 units together as shown using a 1/4" seam allowance.


6. To make the corner block, follow the same basic steps as before as shown below.  The four intersecting seams circled above have been eliminated!


7.  To finish the corner blocks, add your corners, 2 background blocks and 2 half square triangle blocks as  shown.  All four corners are made the same.


8.  Arrange the blocks as shown below and sew together in rows.


9. Sew the rows together and the block is complete!

Friday, March 9, 2012

Triangle Confusion pattern released

Triangle Confusion quilt
I have now released a pattern for my Triangle Confusion quilt! 


The Quilting Gallery has a weekly quilt contest where you can submit a quilt you have made and win a prize.  The theme for this week's contest is Scrappy Triangles and I have entered my Triangle Confusion quilt. Voting begins on Friday. Be sure to check out the site and vote for your favorite quilt.  

Monday, March 5, 2012

Nickel mini quilt

Nickel mini quilt
I made this mini quilt to enter the Modern Mini Challenge at Ellison Lane Quilts.  Be sure to check out all the mini quilts in the challenge!

Modern Mini Challenge

This mini quilt is just 16" square, perfect for a table topper or wall quilt.  This mini quilt is my interpretation of the traditional Dutch Rose quilt block.  


My mini quilt as a table topper

My mini quilt is made from nickel (5") charm squares since using nickels is what this blog is all about. I started a tutorial for this block but as I looked at the finished block, I saw another way to construct it that I think will be faster and easier.  I will post the tutorial soon.  The fabric I used is from the Fresh Mixerz collection by Jan Mullen.  I love this fabric line and am finally using it!  I am using it in my Ribbonry quilt also which is nearing completion and turning out better than I imagined.  Here's the final design for Ribbonry-

Ribbonry quilt design


I am linking to

Lily's Quilts


March Finishes

Tuesday, February 28, 2012

Nickel Churn Dash and Greek Cross quilt block tutorial


How to make a Churn Dash or Greek Cross quilt block from 5" fabric squares ( known as nickel or charm squares)


                     Churn Dash quilt block
Greek Cross quilt block

Step 1.  Cut the following 5" squares of fabric or use pre-cut squares from a charm pack.

Step 1

Step 2.  Draw a line on the back of the white squares. Draw line down the center of 2 squares and diagonally on the other 2 squares as shown below.  I just use a mechanical pencil to draw my lines because it makes a very fine line and you can get close to the ruler.


Step 2


Step 3.  Place a blue square and a white square that has been marked with a diagonal line, right sides together with.  Repeat for the remaining blue square.  Place a red square and a white square that has been marked down the middle, right sides together. Repeat for the remaining red square.

Step 4.  Sew 1/4" away from each side of the marked line for each set of squares that you placed right sides together.


Step 4


Step 5.  After sewing on each side of the line, cut on the marked line.  This cutting does not have to be accurate since you've already done your sewing.  Cut with your rotary cutter or scissors. Your blocks will look like this before they are pressed.


Step 5

Step 6.  Press blocks open.  Press seam to dark fabric.  The blocks should look like this.


Step 6

Step 7.  Square up the half square triangle blocks to 4 1/2" by trimming as shown below.  Line the ruler up with the block on the diagonal line.  Trim 2 sides and then reposition your ruler to trim the last to sides.  You may have very little to trim as shown.


Step 7
                                                                             
trimmed half square triangle block
         
Step 8.  After your half square triangles are trimmed, all of the units of your block are done.  Arrange the units as shown below to make either a Churn Dash quilt block or a Greek Cross quilt block. 


Churn Dash quilt block

Greek Cross quilt block
Step 9.  Sew the block together by sewing in rows, i.e. sew the 3 blocks in the top row together, the 3 in the center row together, and the 3 in the bottom row together.  Then, sew the 3 rows together.

I love this block because you use all of the nickel square without having to trim any down to
4 1/2" like you do in many patterns.  To create the scrappy corners in my Crosswise quilt, I used 4 different half square triangles at the corners of the block.  Since 1 white square and 1 print square make 2 half square triangles, there are duplicate half square triangle blocks used throughout the quilt to create the scrappy look.

There are many ways to arrange these units and many names for this block if the color placement is moved around. Some of the other names are Broken Plate, Double Monkey Wrench, Double T, Dragon's Head, Fisherman's Reel, Hems and Chickens, Hole in the Barn Door, Indian Hammer, Joan's Doll Quilt, Lincoln's Platform, Love Knot, Ludlow's Favorite, Old Mill Design, Picture Frame, Puss in the Corner, Quail's Nest, Sherman's March, Shoo Fly, Wrench, Grecian Design, Grecian Square, Grecian, and Greek Square according to Maggie Malone's book entitled 5,500 Quilt Block Designs.