Saturday, July 9, 2011

Just 5 months to go

There are only 5 months left for my Double Nickel Quilt Challenge and my 55th year.  In honor of this, I have put all of the Double Nickel Quilt Challenge patterns on sale for $5.00 each for the next 5 months.  From July 9 to December 9, 2011, you may purchase any of the patterns as downloads for $5.00!  Don't forget to download the FREE patterns also.   They are an example of how I write patterns.

Boy does time fly! So where am I in this challenge?  I have made 21 quilts and 2 mug rugs.  Four of the quilts need quilted and 2 are ready for binding. I have a pile of hexagons, a pile of 4 patch blocks and a pile of half square triangle blocks waiting to be made into quilts. I have written 14 patterns.  My original idea for the challenge was to design 55 patterns using 5" squares meaning that I would just come up with 55 ideas and draw them up in Electric Quilt.  Well, that is not as easy as it may seem.  From computer to fabric does not always translate well.  So, I decided I needed to make the quilts.  I figured I could do this if I made small quilts.  After all, we have 20 young grandchildren that can use them.  But sometimes I get carried away and make a big quilt like the Nickel Snowball quilt which is finally quilted and bound.


Here's a closeup of the quilting design done by Linda of L&R Designs.  It's a wonderful pantograph design called "Bubbles" that I think fits this quilt perfectly.


I will never reach my goal if I make any more this big!  Expect to see many small projects from here on out.  They will still be projects that use 5" squares just smaller and maybe not quilts per se.  Even I don't know what I'll do next!
                     

Friday, July 8, 2011

FREE pattern added

I can't believe it has been over a month since I posted my last quilt.  It's been a very busy summer so far.  We took a 12 day trip to Texas where my husband won a gold medal in doubles bowling at the Senior Olympic games!  We visited with one of my brothers, my sister-in-law and a niece that live in Austin too.  For the long ride to Texas from Iowa, I grabbed a stack of nickel squares of Kaffe Fassett fabrics and some 2" paper hexagons at the last minute to try my hand at English paper piecing.  It's actually quite easy.  A 5" square is just the right size for a 2" hexagon.


  Here's what I accomplished-

68 hexagons

I have an idea of what I want to do with them but haven't tried it yet.  That will be another post.
Two days after we got back from vacation, I went to a 3 day quilt retreat.  I worked on this quilt and started on 20 flannel bibs for my daughter's daycare business. Who knows when the bibs will be finished!  I used 64 half square triangle blocks, 80 four patch blocks and 52 two patch blocks from those that I made on Memorial Day weekend. This quilt still needs a name and has not been quilted yet.


My Nickel in a Box quilt pattern is now available as a FREE pattern along with my Bright Shiny Nickels quilt pattern.  Both patterns are much easier to access.  You do not have to enter any information or put them in a shopping cart any more.  I hope this helps those who were having trouble getting them.

                   Bright Shiny Nickel FREE pattern                  Nickel in a Box FREE pattern


Thursday, June 9, 2011

Criss Cross Stars

I decided to use more of the many half square triangle blocks that I made over Memorial Day weekend as a border on my I See Stars quilt. I call the new version, Criss Cross Stars.


I think the borders add alot of interest so I'm glad that I used 64 more of the half square triangle blocks and arranged them like I did in my Triangles Askew quilt.  The inner border was made from strips that were in my stash also.  Now, I just need to piece the backing and off to my long arm quilter it goes.  I'll post again when it's quilted and bound but now it's time to head off on vacation!

Saturday, June 4, 2011

I See Stars quilt


I See Stars quilt top
                                                                  
I had a four day weekend on Memorial Day weekend and was able to sew every day at least part of the day.  I spent my time sewing piles of nickel squares into 4 patch blocks and half square triangle blocks in an attempt to use what I have and reduce my fabric stash.  Did you know that 2 nickel squares will make 2 half square triangle blocks that are 4 1/2" square or 2 four patch blocks that are 4 1/2" square?  I figured I couldn't go wrong by sewing up a bunch of these blocks since they end up the same size and both are common units in many larger quilt blocks.

I sorted some nickel squares into piles of 20 of 8 different colors and paired a nickel square of light fabric with each one. These squares became 320 half square triangle blocks. I sorted more squares into piles of 25 of 8 different colors and paired those with a light fabric to make 400 four patch blocks.  I wonder how many quilts I can make out of these blocks!

My first quilt to use these blocks is titled I See Stars and used 96 4-patch blocks and 96 half square triangle blocks.  Can you see the stars?  Each row is made of star blocks but there is also a secondary star pattern.  Here's the star block-


Look at all those ugly fabrics used together!  The contrast of light and dark is what's most important to this quilt design.  The star block is made of four smaller units that are four patch blocks made from two half square triangle blocks and two 4 patch blocks.

To make the half square triangle blocks, I just draw a line from corner to corner on the back of my light nickel square, place it right sides together with the dark nickel square and sew 1/4" from each side of the line and cut down the middle on the drawn line.  I do square up each block even though I don't like taking the time to do it.  It just makes the piecing more accurate and faster in the long run.
I use the June Tailor Perfect Half and Quarter Square Triangles Ruler to make my blocks this way.

This quilt is not quilted yet as my long arm quilter's son is getting married next weekend.  Can't wait to see how she quilts this one!


Wednesday, June 1, 2011

Triangles Askew quilt

One of the primary reasons for me starting this challenge is that I have alot of fabric that I would like to use.  My fabric stash spans many years of quilting and buying fabric so I have quite a bit of fabric.  The biggest problem for me is that as fabric has changed so has my taste in fabric.  Now I have a room full of fabric that I'm not that crazy about. I figure the best way to use it is to make scrap quilts which fits well with my challenge of creating quilts from nickel (5") squares of fabric.  For the most part, I have used fabric from my stash for this challenge but I seem to keep buying backing fabric.  I really need to start making the back of my quilts scrappy also. As if the challenge of creating 55 quilts using 5" squares isn't enough, I'm now challenging myself to not buy more fabric until I use what I have.  We will see how long that lasts!

On that note, I am proud to say that my Triangles Askew quilt was made entirely of fabrics from my stash! I have been wanting to design a masculine quilt and asked my husband if he thought the border fabric (see photo below) was masculine.  He said,  "Well, those are dartboards", referring to the pattern on the fabric. Don't know why I didn't see that. 

The fabric used in the border became the inspiration for the color scheme.  After pulling coordinating 5" squares from my many stacks of nickel squares, I chose the tan fabric for my background and decided to make half square triangle blocks.  My Triangles Askew quilt is the result.  It has not been quilted yet and I am still working on piecing the back.  I'll post the finished quilt and be sure to show the back.


Monday, May 23, 2011

Jumbled quilt

When I was designing my Twirligig quilt I made a few blocks that would not work for that quilt.  That quilt needed contrast between the fabrics to make the pattern stand out which the rejected blocks did not have.  So, I decided to make a few more of the rejected disappearing 9 patch blocks and came up with Jumbled.  Though it may look complicated at first glance, it is super easy.


I used the same Kaffe Fassett fabrics, the same 9 patch block construction and cutting method as Twirligig and came up with a totally different quilt.  I just changed how I arranged the 4 parts of the disappearing nine patch after I cut each block.  I did not sew the 4 pieces of each block back together to form the traditional disappearing nine patch block.  Instead, I used each of the parts as it's own block in my Jumbled quilt.  So,  the nine patch actually became 4 new blocks.  The blocks are arranged in an alternating pattern which I think makes a great scrap quilt!

For the quilting on this quilt, Linda of L&R Designs used her version of a design called Wonky Feathers.

Saturday, May 14, 2011

Nickel Gumball quilt


In my sewing room sits a gumball machine.  Our grandchildren love putting in pennies and getting gumballs out.  I think every one of them has gone through the stage where they only want a certain color of gumball.  So they keep putting in pennies until they get the color they want.  Right now Macy only wants pink gumballs.  The gumballs in that machine with their bright colors along with this polka dot fabric from my stash was the inspiration for my Nickel Gumball quilt .


To make a gumball, I started with nickel square,of course, and made a snowball block.  I wanted to arrange the gumballs randomly so I designed a block where the snowball was not in the center as shown below.  All I had to do was rotate the block to create the random layout that I wanted.


Linda of L&R Designs used a pantagraph called Double Bubble to quilt my Nickel Gumball quilt.  Here's a close-up-


Friday, May 6, 2011

Twirligig quilt

I recently discovered the Disappearing Nine Patch block.  Not the concept itself but the now common name for cutting up a nine patch block and rearranging the pieces.  Since I have been doing alot with my idea of the Nickel Nine Patch block which is a nine patch made from nickel (5") squares or strips, I thought I'd try the Disappearing Nine Patch technique on the Nickel Nine Patch block. And Twirligig was born!


I used scraps of my Kaffe Fassett fabrics most of which I already have cut into nickel squares.  When I realized that I had six colorways of the same print, I decided to use the print in the center of each Nickel Nine Patch block.  Here's pictures of how I did it-


This easy technique can create very interesting designs that look complicated.  Try it, you'll like it! Remember that old saying from the seventies and maybe a commercial?  Now I'm dating myself but I've already told everyone my age anyway.  Ha!

I wanted an overall quilting pattern for my Twirligig quilt and as usual my long arm quilter gave me more than I expected.  Linda of L&R Designs came up with a custom design that she calls Cockscomb Meander.  The variegated thread was the perfect choice also.  Check out her blog to see more inspiring quilting designs.


Monday, April 25, 2011

Nickel I Spy #3

This I Spy quilt is for Lily. Lily turns 4 this week. We have 6 grandchildren turning 4 in a year's time.  From September 19, 2006 through September 18, 2007, my husband's 4 daughters, my daughter and my son's wife all had children!  I think that's probably some kind of record.


Lily has a baby sister, Lucille or Lulu as Lily calls her so I thought it would be nice for them to have matching I Spy quilts.  By matching, I mean all of the I Spy squares are the same in each quilt but are arranged differently so they can play a matching game when Lulu gets old enough.


As you can see, I added their names in the center of the quilt.  I fused the letters of their names on and did a small zigzag stitch around each letter.  I used a different color scheme for each quilt.  The same fabric was used for the name, the backing and binding on each quilt-pink for Lily and lavender for Lucy Violet.

Linda of L&R Designs did a cute flower and loops quilting design that really added to the "girlyness" of the quilts.  Here's a close-up of the design on Lily's quilt.   A pastel variegated thread was used on Lily's quilt and a lavender thread was used on Lucy's.  Two quilts done, many more to go!

Saturday, April 16, 2011

Easter Eggs quilt

Just in time for Easter with a week to spare!  I say this with surprise because I too often finish projects late or give up on them when I know I can't complete them by the time I want to use them or give them as gifts. 

This Easter Eggs quilt just popped into my head last week. As I sat staring, with a basket of odd pieces of trim sitting in my line of vision, I came up with the idea to "decorate" some nickel squares.  This turned into decorating "egg" blocks and my Easter Eggs quilt was born.  Funny how the design process works sometimes!  Now I have a table topper to decorate my table for Easter or maybe I'll put it on the wall and use it as a wall hanging.


To decorate the "eggs", I used scraps of ribbon and rickrack of various sizes and even some scraps of chenille strips.  I left a few eggs without any embellishment when I felt the pattern of the fabric was enough.  A fat quarter was used in the center and was the color inspiration for the fabrics and trims.  This project would be a good use for all those decorative stitches on my machine that I never use.  Maybe sometime I'll decorate some eggs that way.  Here are some close-ups of a few of the eggs-


As I was looking at this quilt on my table, I decided that Easter Egg coasters would be cute so I made this one.

            Easter Eggs quilt as a table topper                                  Easter Eggs coaster


Sunday, April 10, 2011

Nickel Snowballs quilt

The Nickel Snowballs quilt is a great way to use a lot of your fabric scraps.  I used 70 blue nickel squares and 245 white nickel squares, all from my stash. I love the look of the scrappy white on white fabrics.  Of course, any color could be used.  I just seem to have lots of blue fabric and I barely put a dent in it even though  the quilt ended up so big that I had to lay it on a bed to photograph it.  It has not been quilted yet but I'll post it again when it has.  It's laying on a queen bed but is actually a twin size.  Doesn't look too bad in my blue and white bedroom. I can't make too many more this size or I'll never catch up up on my challenge!
 
Nickel Snowballs quilt

Nickel Snowballs is another quilt from the Nickel Nine Patch series of quilts that all begin with a nine patch block of nickel squares.  Just start with a 5" square of fabric and add smaller squares to all four corners.  Sew diagonally across the corners as shown and then press the squares to the corners to form triangles and you have a snowball block.


After making the snowball block, I incorporated it into a nine patch block. This nine patch block makes it easy to achieve the look of sashing and borders without the hassle of long strips.  I used 5" X 14" strips to replace 3-5" squares in this example.  I had enough fabric to do this which really cut down on my cutting and sewing time.


My next quilt project is much smaller and just in time for Easter.  It can be used as a wall hanging or table topper.   I'm using up a bunch of small odd pieces of trim that I don't know why I even kept.  Here's a peek-


Sunday, April 3, 2011

Flower Power

Flower Power is the flower version of my Twisted Nickel quilt.  Both quilts are made using the exact same block!  Color placement makes all the difference.  They are part of my Nickel Nine Patch series of quilts.  That's the name I'm giving all my quilts that start out as a nine patch made up of 5" squares.


Here's how to make this block also called Washington's Puzzle.  The scraps you see off to the side of the ruler will someday be a second quilt. What a deal, two quilts from one set of blocks.


Here's the quilt I am working on to use the scraps from the Twisted Nickel quilt.  Just an idea right now.

Sunday, March 27, 2011

I'm Back

It's been awhile but I hope to get back on a more regular schedule with my posts.  While I was gone, I was featured as a guest blogger on The Quilting Gallery.  Check it out if you want to find out more about this challenge.

I've been back from the AQS quilt show in Lancaster Pennsylvania for a week already and am happy to say my husband survived his first quilt show!  I don't know where the time goes. It's not that I haven't been busy, my Twisted Nickel quilt is now quilted and bound.  This picture doesn't do justice to the fantastic quilting done by my long arm quilter, Linda of L&R Designs, so I've included two close-ups of the quilting design.


I have been working on another version of this quilt and on what to do with the leftover scraps from this project.  I hope to show you what I come up with next week.

I also sewed binding on a quilt on our drive to Pennsylvania.  It was one of my UFO's.  I think I started it maybe 3 years ago.  I know it's been quilted since before Christmas of 2009!  But, it's done now and hanging on the wall hiding an ugly electrical box and cable outlets.  If it looks a little crooked, it might be because it's stapled to the wall!  I don't want to take time to make a sleeve and it probably won't be a wall quilt after we move anyway. The squares are stacked and sewn so the raw edges can fray.  It's a very easy quilt and uses alot of fabric. 


And, last but not least, I have been writing patterns for the quilts of this challenge and working on a web site for them.  The site is up at http://www.doublenickelquilts.com/ and will eventually have all of the patterns for sale as downloads.

And, oh yeah, did I mention I work full-time?

Wednesday, March 9, 2011

Twisted Nickel quilt

The block in this quilt is a variation of a traditional block called Washington's Puzzle. There are a few different ways to make this block.  You can cut nine individual pieces for each block and sew them together or you can paper piece the block. I chose to make nine patch blocks and then made angled cuts to form a new square.  A consequence of this construction method is leftover pieces from trimming the blocks and bias edges on the outside edges of the block.  Don't see a way to get around having bias edges somewhere.  I hope to design a way to use the leftover pieces in another quilt.  Do you see the secondary pattern of flowers that developed by rotating the blocks?  There's an idea floating around in my head about making the flowers more predominate in another quilt. 


This quilt has not been quilted yet.  Life beyond quilting has been very busy.  My husband bowled in the State bowling tournament this weekend and our house is finally on the market with my sewing area being neat and tidy but almost unusable.  I have to get so much stuff out and put it back every time I sew.  What a pain!

On another note, we were fortunate to have my husband's oldest daughter and her two youngest children stay with us for a few days.  They are moving from Illinois to Denver Colorado and were heading into bad weather so stopped and stayed with us until today.  It was good to see them since they will live much farther away now. 

There won't be a post next week because my husband and I are off to the AQS quilt show in Lancaster Pennsylvania.  We are very excited for the trip because two of his daughters live about an hour from Lancaster so we plan to spend time with them and six of our grandchildren.  I'm ready for a break from this challenge and hope to come back refreshed and ready to sew.  I have a lot of catching up to do to keep on track to make 55 quilts in a year.

Sunday, February 27, 2011

Fluttering Around

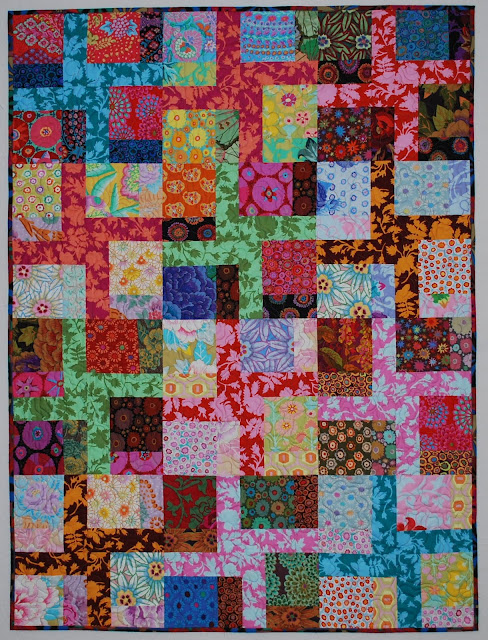
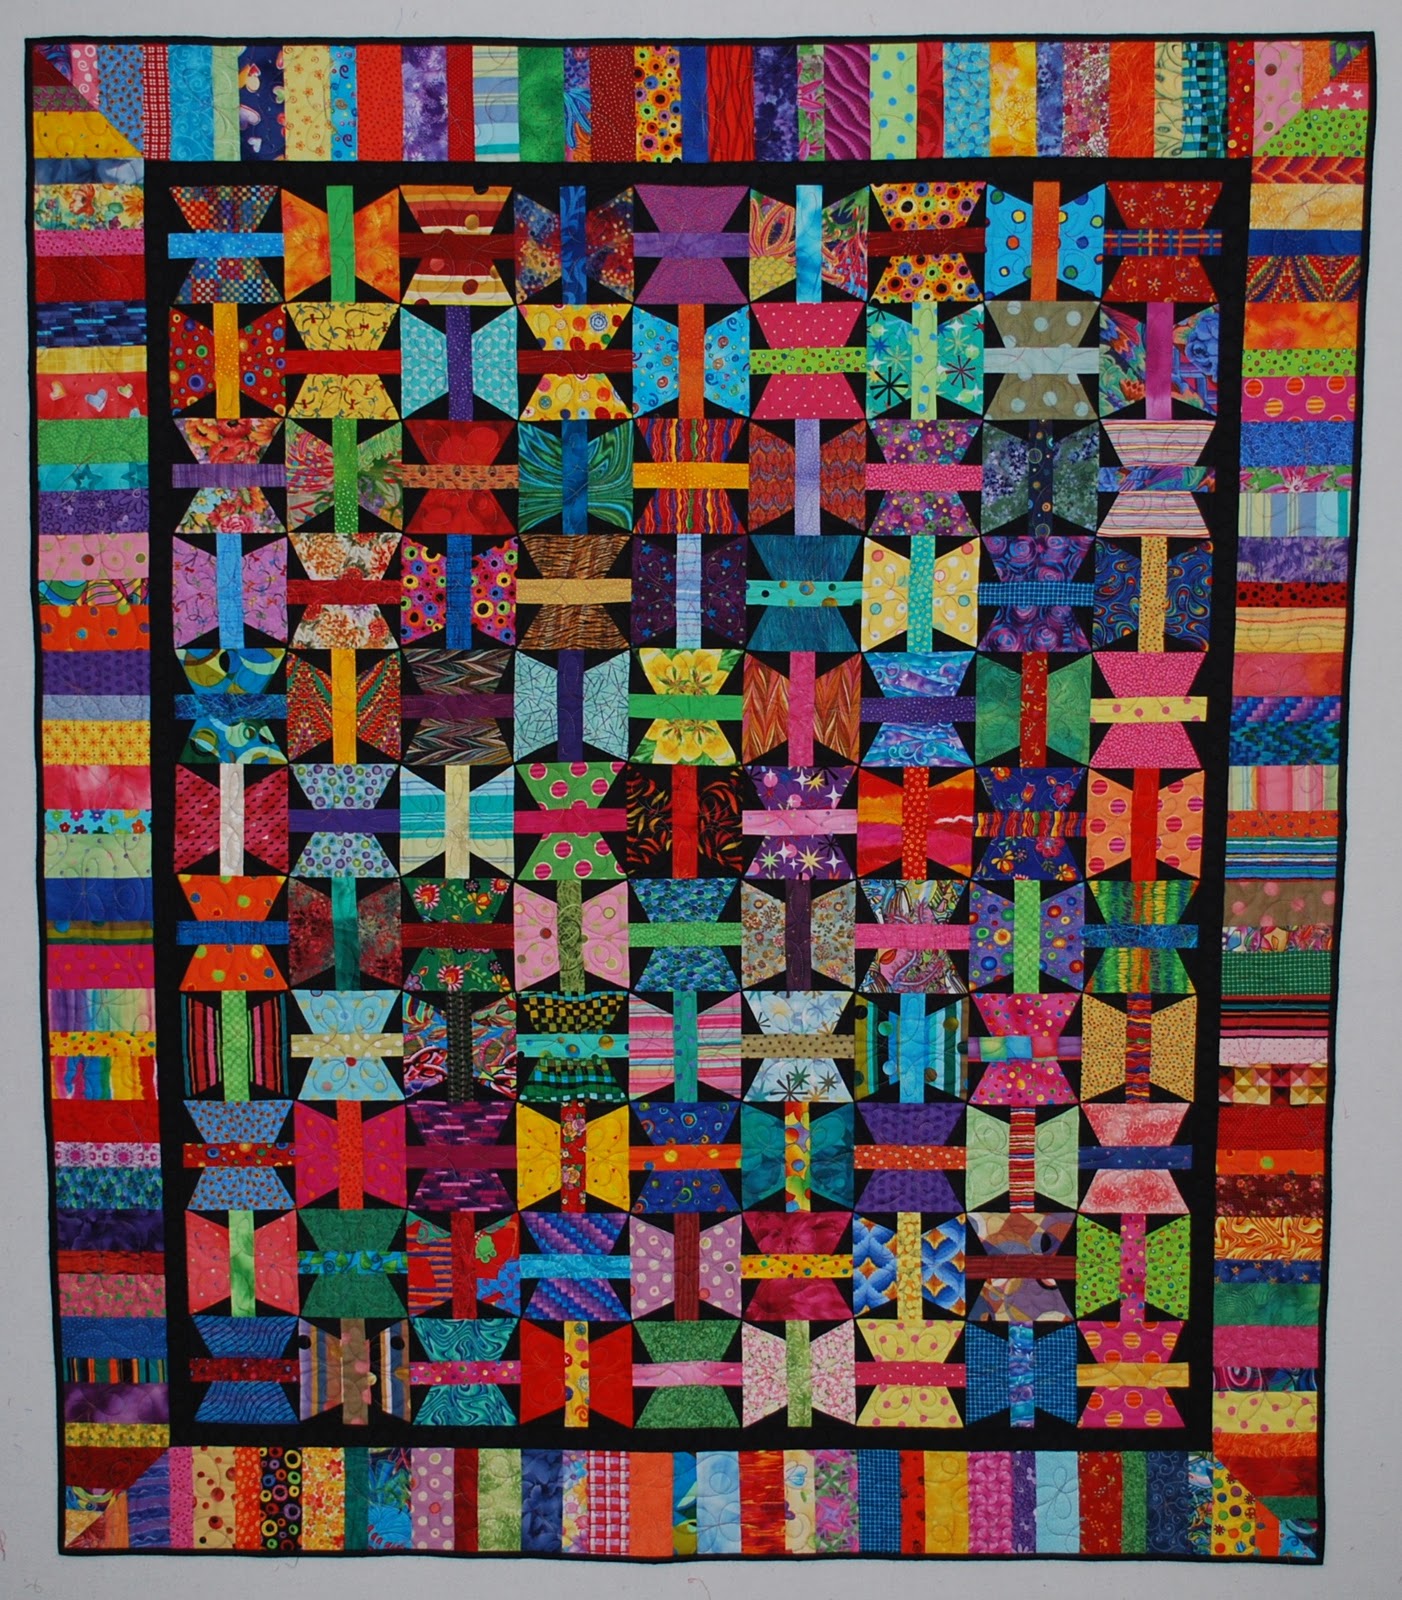
Finally done!!  Here's the butterfly quilt that I gave you a sneak peek of last time.


As you can see, this quilt has 
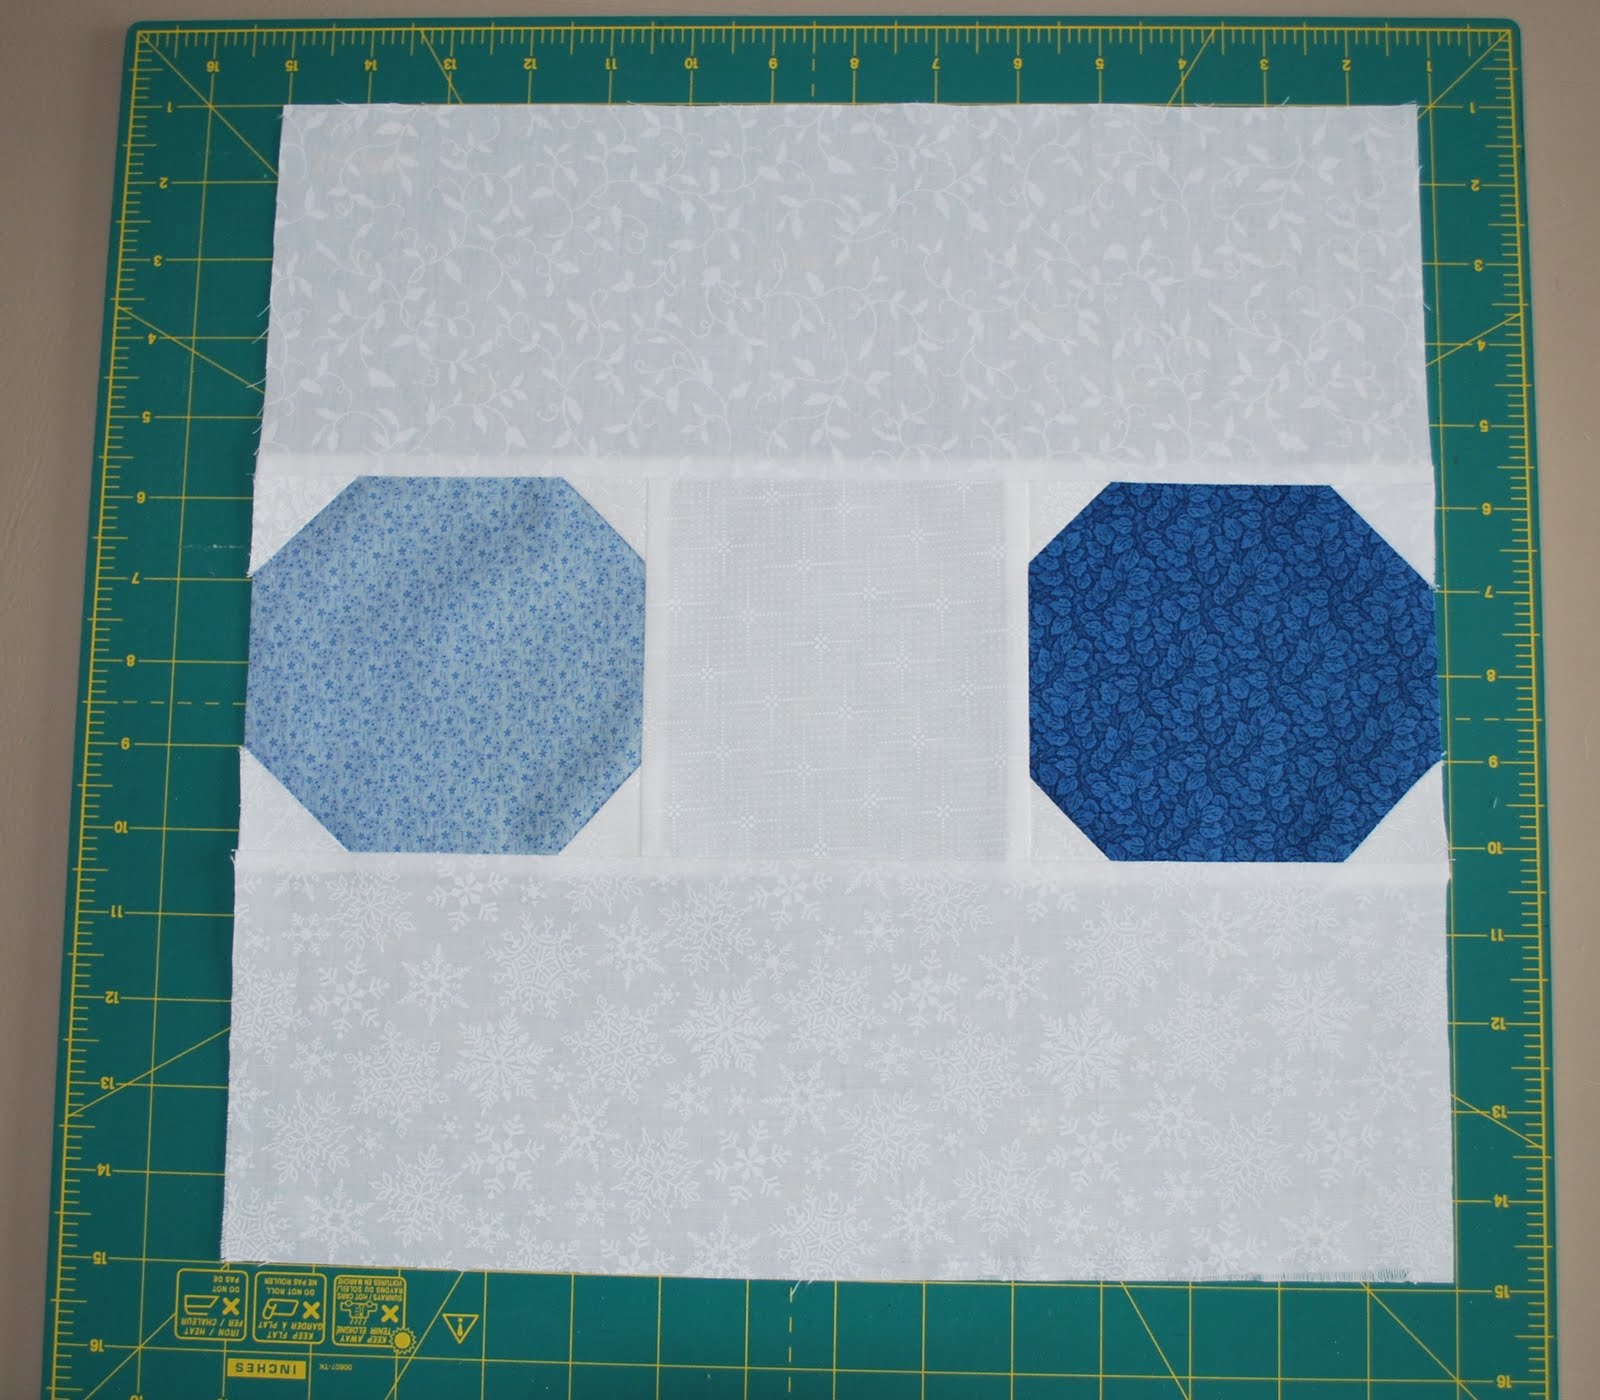
way more pieces than any of the quilts I have previously posted.  I used 5 inch squares and some smaller scraps to make the 99 butterfly blocks and 44 blocks in the border. It's a great way to use a bunch of scraps.  The time it took to complete it put me even more off track of my goal of 55 quilts in in my 55th year.  I am 8 quilts behind already!  I call this quilt Fluttering Around for two reasons-the block looks like butterflies to me and it describes me right now.  Since I have started this challenge, it seems like I have been busier than ever.  One major thing that has been happening lately is that we are getting our house ready to sell.  We put in new carpet this week and that meant moving 4 bedrooms and 1 living room of furniture and then putting it all back.  Very exhausting.  A new master bath floor goes in tomorrow morning and then maybe we will have some semblance of normal for awhile.  However, having our house on the market means I can't take over half of it with my quilting.  I have to get really organized and put everything away so that the house shows well.  That is going to be very hard.

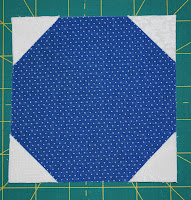
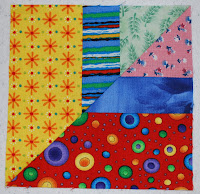
Though I think this block looks like butterflies, it is my interpretation of the Beggar's Block.  The Beggar's Block is a nine patch block the has a solid square in the center.  My block has a butterfly in the center.
It took a lot of trial and error to figure out how I really wanted to construct this quilt. The good news is that I came up with a much easier way to make it as I was going through the design process.  I first starting making the blocks using paper piecing and then decided to eliminate that whole process.  I made the borders as long strips (which I hate to do) but figured out how to not do that in the future.  I also came up with a super simple way to miter the corners.  I call it a fake miter.  If somebody else has figured this out, I certainly haven't seen it.  Here's a quick tutorial-


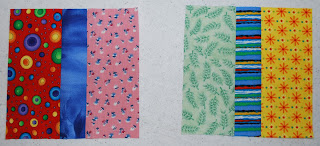
The border is made up of these blocks.  I needed 2 blocks for each corner-1 for the top border and 1 for the side border, for example. 


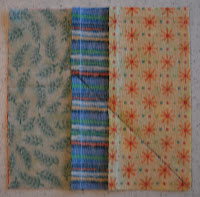
I placed the 2 blocks right side together, drew a line from corner to corner and sewed on the line.
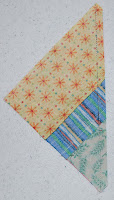
I then cut 1/4" from the sewn line to get my seam.  I pressed it open and voila, a mitered corner.

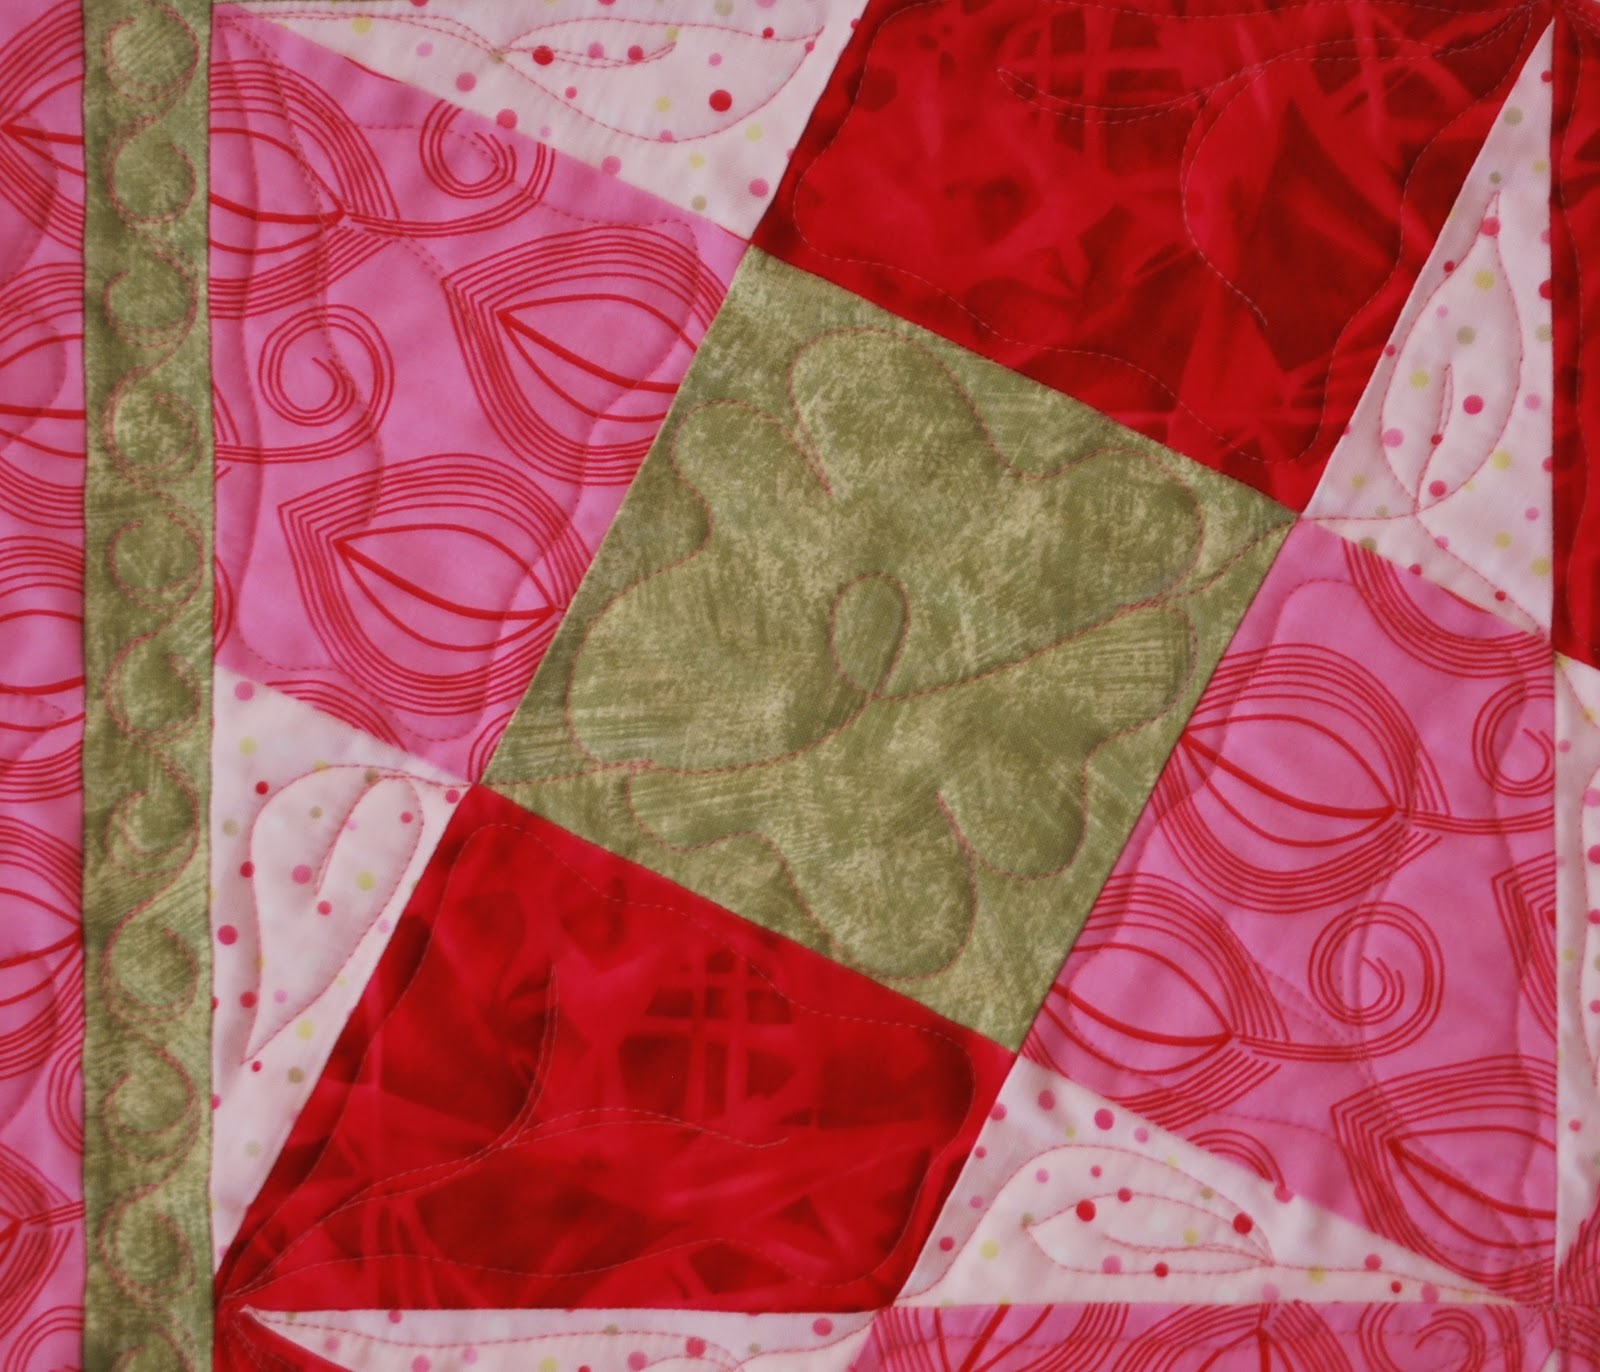
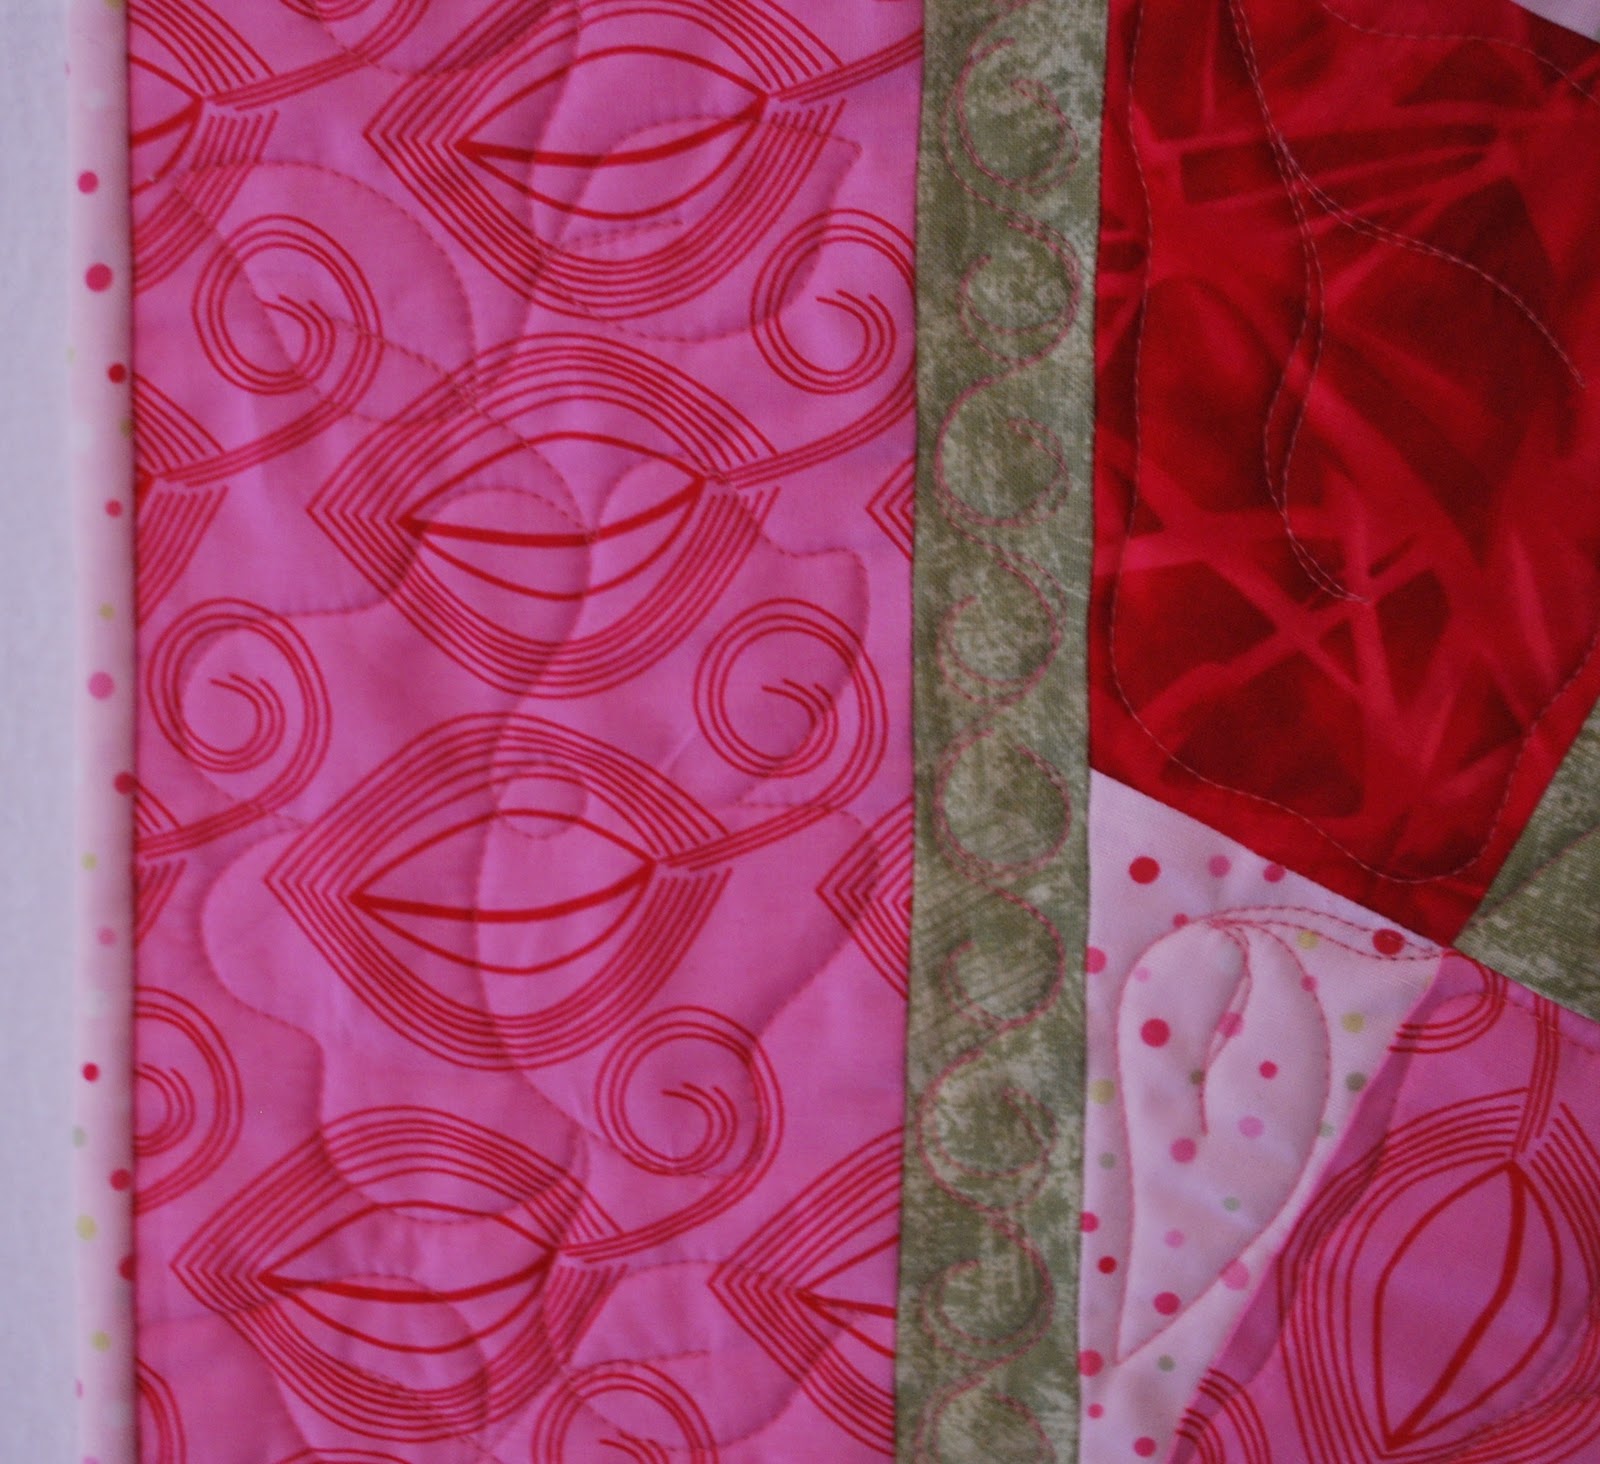
The quilting on this quilt is a custom design by Linda of L&R Designs.  I think it's the perfect design to emphasize the butterfly block.  The variegated thread is a perfect choice too.