Monday, September 26, 2011

Nickel Double Four Patch quilt

My Nickel Double Four Patch quilt uses more of the four patch blocks that I made back on Memorial Day weekend.  Another quilt made entirely from my stash!


This time I combined the four patch blocks with squares of green fabric and cream fabric and then alternated the blocks throughout the quilt.  I seem to have alot of green fabric so I decided to see what would happen if I kept all the dark squares the same.  I'm happy with the outcome and very happy to be using some green fabric.  Here's what the blocks look like.


 I pieced four different green fabrics together to make the backing creating another four patch and using more green fabric.  The scrappy binding was made from scraps of fabric left over from the backing.


Linda came up with a fun quilting design for this quilt. She used a cream thread throughout which works perfectly.

Monday, September 19, 2011

Mack's quilt

Five years ago today, my second grandson was born.  Macklane (Mack for short) is my daughter's first child.  Little did we know when Mack was born that my husband's four daughters and my son's wife would all have babies in the next year!  Bridger is the last one born in that year time frame.  He turned four yesterday.

I made this I-Spy quilt for Mack's birthday.  He hasn't seen it yet because his birthday party isn't until the weekend.  I hope he likes it!  The backing has construction vehicles on it and he loves that sort of thing.


I plan to make Mack's three little sisters I Spy quilts using the exact same fabrics that were used in his quilt.  I'll arrange the I Spy fabrics differently for each quilt so they can use them to play a matching game and since their names will be on them, there shouldn't be any fighting over whose is whose. One of his sisters has a birthday in November and the other in December, the day after my birthday so I guess they need to be part of this Double Nickel Challenge!


Linda of L&R Designs used a variegated thread and custom quilting design to quilt this quilt for me.  I used the same fabric for the binding and the letters of Mack's name.  I really wished I would have noticed that red square above the K in his name.  I would have moved it if I would have noticed before it was quilted!

Sunday, September 11, 2011

Nickel Flower quilt

My Nickel Flower quilt is another quilt made entirely of fabrics from my stash.  Woohoo! It has 35 flower blocks.  Each block uses 4 nickel (5") squares and each fabric used in the flowers has a circular theme-polkadots, swirls or circles.  I used a bright color theme and made the background on each flower block contrast with the fabric used in the flower.  I used the same yellow fabric in each of the flower's centers.  This was a quick, easy quilt that was fun to work on. 


I pieced the backing using fabrics that followed the theme of the quilt.  I had 3-1 yard pieces of fabric to work with and decided on this arrangement.  I used the leftover backing to make the binding and matched up the binding and the backing when sewing on the binding to make the binding look scrappy like I have shown on previous posts.  It's a great way to use the long strips left after trimming your quilt after it's been quilted.


The quilting design is a custom pattern by Linda of L&R Designs.  Check out her web site's new look!   

Thursday, September 1, 2011

5 more quilts done

Five more quilts done bringing my total to 36 with 19 to go and 15 weeks to do it in!

My husband went to Denver last weekend to visit his daughter and her family that recently moved there.  As a bonus, another daughter and her family were there visiting at the same time.  (I had to work.)  Anyway, I had the bright idea that this would be a good time to deliver some I Spy quilts. The youngest grandchildren in both families are 4 years old already and I want them to get some use out of their quilts before they are too old or big for them.  Of course, I didn't even have them started.  Nothing like a goal to get me moving!  I tried a different arrangement of I Spy fabrics for each quilt, put their names on them and used a backing that had some meaning to each individual child.  I made these a little bigger than the ones I have posted already.  They finish at 41"X50" approx.


This is a closeup of the Loops and Mod Flowers quilting on Evie's quilt done by Linda of L&R Designs. 


Bridger lives in Denver and Felix was visiting from Pennsylvania so they were the first to get their quilts.  Here they are posing for pictures. They have their grandfather's sense of humor in the first picture!


Evie and Elliot live in Pennsylvania also and had their quilts delivered to them by their aunt who was visiting in Denver.  Here they are modeling their quilts.


The fifth quilt I just finished is a version of my first Free quilt pattern entitled Bright Shiny Nickels. I made the top only as a model for a quilt shop that sells my patterns.  The owner of the shop wanted to use the alphabet fabric in a kid size quilt so we used it as the background.  The quilt is still made basically the same way, with 5" squares and strips, but not all blocks are nine patch blocks.


Monday, August 29, 2011

X is for Xavier

Thanks so much to all of you that suggested a name for my quilt.  I hope you find time to use your free patterns.  Please let me know if you have a suggestion to make a pattern better or if you find an error.  There are still a couple of people that I don't have email addresses for so if you haven't received your free pattern yet please send your email address to me at candace@doublenickelquilts.com.

The name I have chosen for the quilt is Xavier's Quilt.  Xavier, X for short, is my oldest grandson and he just turned 7 last week.  I mentioned to him in passing that I had made a quilt with a big X in the middle.  His eyes got really big and he said, "Can I have it?"  What's a grandma to do?  I had his mom show him the quilt on the blog to see if he would really like it.  I thought he might not like the fabric or something.  However, he called me on the phone to tell me he liked it and once again said "Can I have it?"  So, this is how the quilt became Xavier's Quilt!  An added bonus is that the green paisley fabric in the center of the backing was from the first quilt I made for his daddy when he turned 21.  X thinks that is pretty awesome!


Sunday, August 21, 2011

Name My Quilt contest

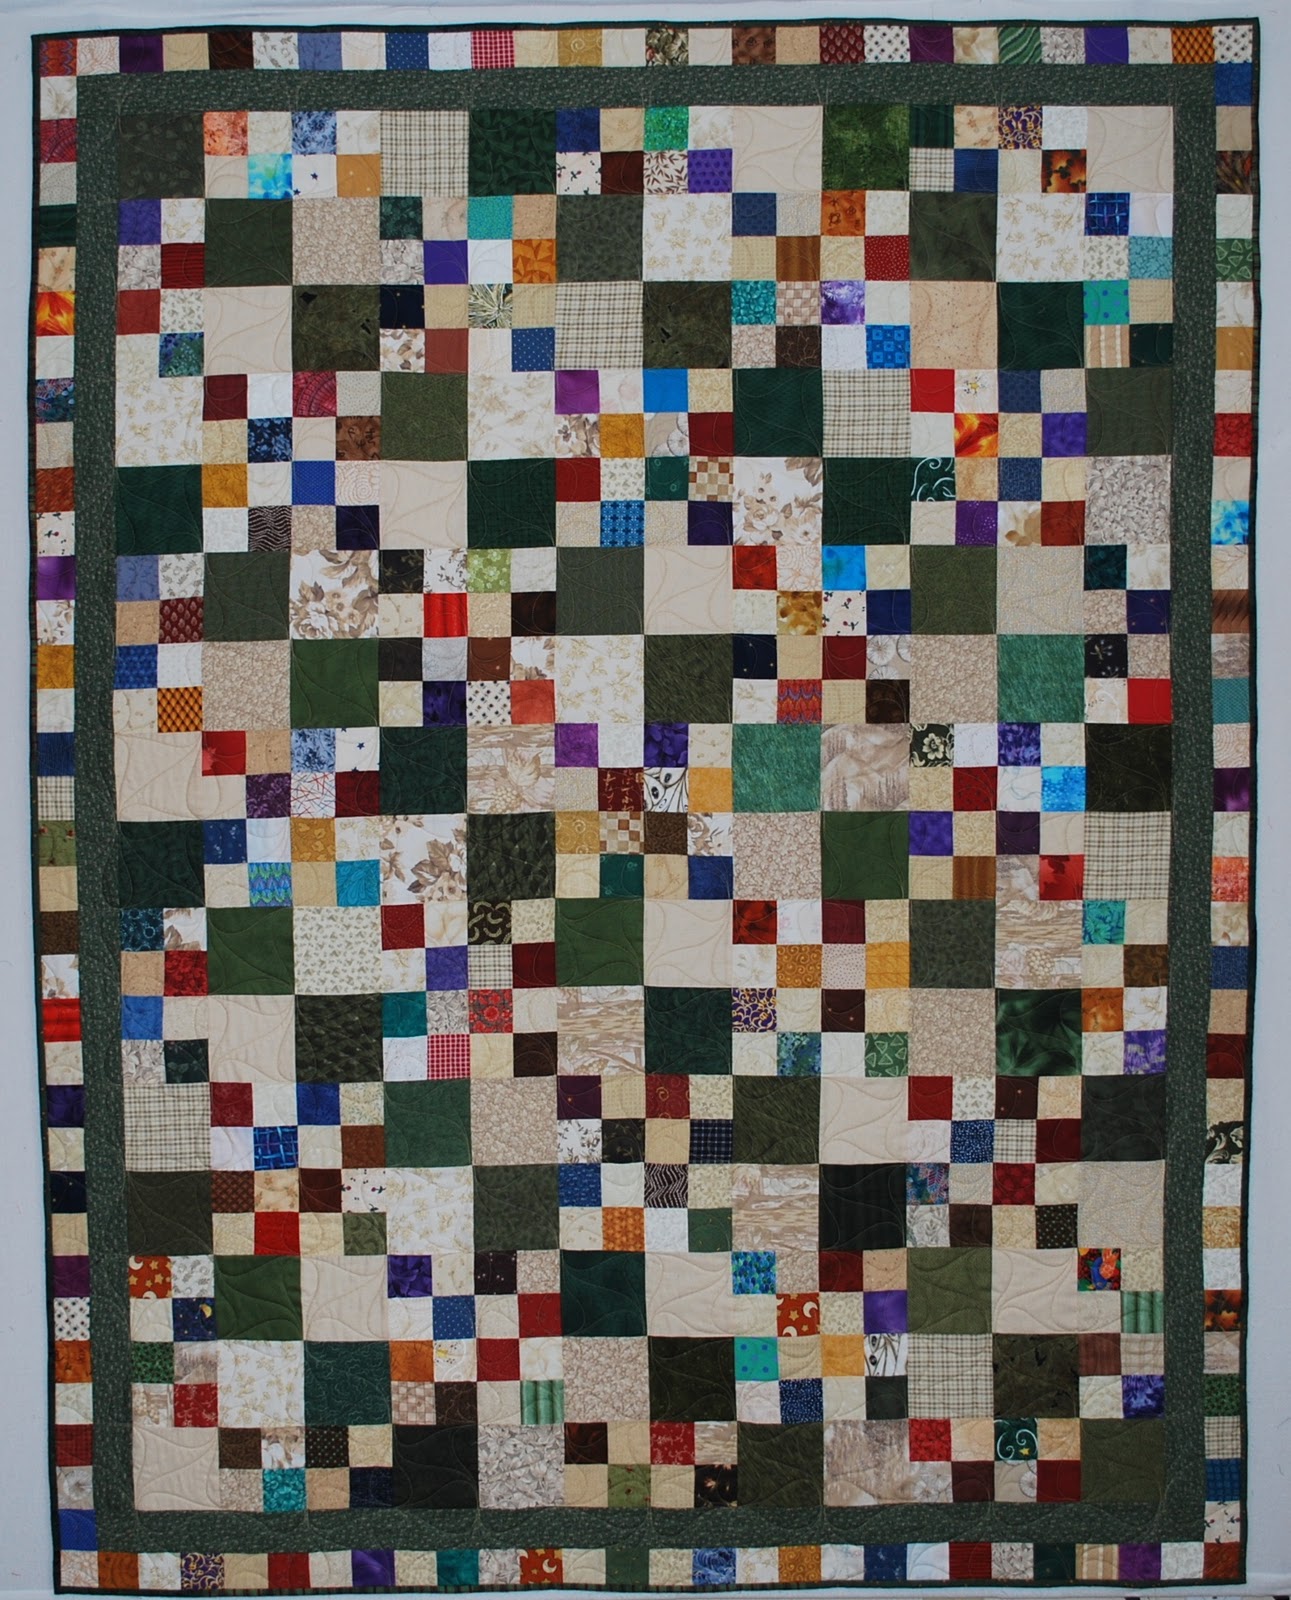
My yet unnamed quilt is finally quilted and bound!


The first time I posted this quilt when it was not yet finished, three comments were left suggesting names for the quilt.  Click here to see the original post and comments.  My husband got a big kick out of Deb's comment! Karin left this comment-"Oh my gosh - did you have that beautiful quilt in your head when you were making the triangles & squares, or did you just figure it out when you laid 'em all out? Whatever, it's gorgeous!! How about calling it the Road to Texas, or Right Up Your Alley (in honor of the bowling hubs did)? Very nice, whatever you call it!"

That comment gave me two ideas-
1. I could show my design process
2. I could have a Name My Quilt contest

So, here's how the design process went-
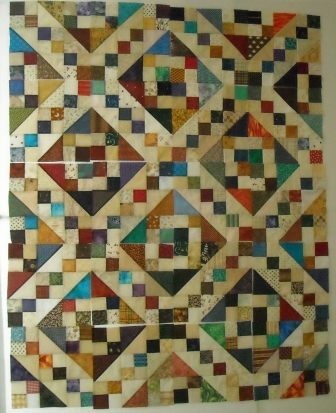
I paired up lots of light neutral fabric nickel squares with lots of darker nickel squares and made each set of squares into half square triangle blocks or four patch blocks.  Then, what to do with all those blocks? 
I made a bunch of them into this nine patch block, made 20 of the blocks,


laid the blocks out on my design wall and took these photos,


(The photos are pretty bad but I was only taking them to record the layouts not knowing at the time that anyone else might see them.)

decided on this last one and sewed it together.  Wow, I just realized that here are 9 more quilts that I designed.  They should qualify toward my goal of designing 55 quilts in my 55th year. Yippee, that brings me up to 31 quilt designs and 7 other ideas for using nickel squares!

Then I decided it needed a border and went through the same basic process to decide on the border.  As you can see in the finished photo above, I chose an inner and outer border. 

Last but not least, I had to go through my stash and find something for the backing and binding.


I pieced the backing using fabrics from my stash and used more of the same strips from my stash that I used for the inner border for the binding.  Another quilt without buying any more fabric.  Hooray!!
Here's a close-up of the quilting by Linda which is a wavy X with smaller Xs in the border.


Now, for the contest(actually more of a give-away), I decided to let you name my quilt!  To be eligible for the Name My Quilt Contest, just leave a name for this quilt in the comments at the bottom of this page and you will get a FREE pattern download of your choice.   Be sure to tell me what pattern you would like from the choices here.  Don't leave an anonymous comment or I won't know where to send your free pattern! If you prefer, you may send me an e-mail instead.  Those that have left names already can just send an e-mail and let me know what pattern you would like.  The pattern is for your own personal use only and cannot be copied and shared.  If you have a friend that may like a pattern, just tell them how to enter.  You have until midnight (CDT) on August 22 ,2011 to Name My Quilt and receive a free pattern.

Thursday, August 4, 2011

Criss Cross Stars done and contest

Criss Cross Stars is done!  Another quilt made entirely from my fabric stash.  There are 96 4 patch blocks and 160 half square triangle blocks in this quilt. I pieced the back on this one also which I really don't like to do but it sure helps use up the ol' stash.  However, my husband walked into my sewing room the other day, looked at my fabric and said "You haven't made a dent."  I have made 20 some quilts and he's right, my stash doesn't look noticeably different. 


I did something a little different with the binding.  Here's a close-up-

I used the backing that's left over after it's machine quilted, the extra width and length they need to attach it to their machine, to make the binding.   But since the back was pieced, the binding was pieced so I just matched it up and made it fit.  The photo is showing the back of the quilt with a portion of the front flipped over onto it.

Linda of L&R Designs then quilted it with a pattern called Plumage.  Check out her blog for quilting design ideas for your quilts.  I'm going to start a contest in the near future where you can win a pattern so check back for details!


Tuesday, August 2, 2011

Triangle Confusion

Finally, Triangle Confusion brings to an end the pile of half square triangles I started way back on Memorial Day weekend!


The block is loosely based on the Windblown quilt block.  I say loosely because I only used half square triangles and made it very scrappy instead of just two colors.  For most anyone looking at this quilt top, it is very confusing to pick out the block at first glance.  Thus, the name. There are a bunch of  secondary patterns created also-pinwheels, 3d boxes or cubes, square in a square...  The actual block is made from 16 half square triangle blocks.  After I figure out what  to use on the back, off to the long arm quilter it goes.


Wednesday, July 27, 2011

Craft Gossip feature

I'm featured on Craft Gossip!  Check out the site.  It has tons of information on quilting and about any other craft you can think of.  They say "CraftGossip.com editors post the best craft tips and ideas daily" and I think that sums it up very nicely.

On another note, Triangles Askew is finally quilted and the binding is on!!  I pieced the back from leftover blocks, background fabric, border fabric and a 2 yard cut of fabric from my stash. The binding was made from strips that were already cut (for some UFO probably). So, I'm proud to say that once again, I made a quilt from my stash.


This one was a hard one to figure out how I wanted it quilted.  But as usual, Linda of L&R Designs figured out a perfect solution. 


Sunday, July 24, 2011

5 projects using 5" squares

We stopped at a quilt shop in Kansas City on our way to Texas last month and when I saw these fabrics the thought of an email from my daughter-in-law popped into my head.  Last January she had sent a link to some dish mats that she liked and wondered if I could help her make some.  I thought this fabric would be perfect for a dish mat or two.  The design for the mat also popped into my head as soon as I saw the fabric.

Her birthday last week was just the deadline I needed to make one for her.  If you are wondering where the 5" squares are, they are cut into 2 1/2" squares.  I used 5 coordinating nickel squares of assorted colors, 5 white ones, a fat quarter  and some terry cloth to make this dish mat.  The dish mats she saw are no longer available but the site she saw them on has a tutorial on how to make them.  My mat is not made like the one in the tutorial but it does have a terry cloth back as does the one in the tutorial.  I stitched along the edge on my first try at making this dish mat and did not like how wavy the edge looked.  On the one shown above, I stitched along the edges of the center section instead and like the result much better.
Since I had last said that I need to make some smaller projects, I continued with the kitchen theme to make some coordinating items.  I made 2 styles of pot holders,                        
                                             
     (Both use 4 nickel squares.) 
 
 a mug rug, and a couple of fingertip pot holders.
 These little pot holders are so easy to make and come in so handy that I decided to provide a tutorial-

1.  You need four 5" squares and one 5" square of batting.  Fold two of the squares in half.


2.  Layer one square right side down, batting, one square right side up, and the two squares that have been folded.  The folded edges need to meet at the center.  Place a CD on top of the stack and draw around it.


3.  Sew 1/4" inside the circle.  Cut on the drawn line.

4.  Turn inside out.  Stitch around the edge or tack the ends as shown.

     
These little potholders can also be used as coasters for your wine glasses!